


TL;DR:
- Proper setup ensures the alarm device functions reliably during emergencies.
- Regular testing and maintenance prevent issues like weak signals or false alarms.
- Taking time to configure and teach loved ones builds trust and effective safety teamwork.
Many families only realize their loved one’s alarm device was never properly set up when it’s too late. A missing SIM card, a dead battery, or an untested SOS button can mean the difference between fast help and a frightening wait. Getting the setup right from day one is not complicated, but it does require following the right steps in the right order. This guide walks you through exactly what to prepare, how to configure your device, what to do when something goes wrong, and how to keep everything working reliably for months and years ahead.
Table of Contents
- Gathering everything you need for setup
- Follow step-by-step setup instructions
- Troubleshooting common setup issues
- Testing and maintaining your alarm device
- Why alarm device setup isn’t just tech, it’s trust and teamwork
- Discover devices and SIM options that simplify setup
- Frequently asked questions
Key Takeaways
| Point | Details |
|---|---|
| Prep before you start | Having all components and documents ready makes setup smoother and prevents early frustrations. |
| Step-by-step works best | Following a clear sequence helps avoid common pitfalls and ensures reliable alarm performance. |
| Test and maintain regularly | Frequent checks and updates are key to keeping your alarm effective and trustworthy. |
| Troubleshoot with confidence | Most issues can be fixed with simple steps like better placement or checking connections. |
| Teamwork builds trust | Involving family or caregivers in setup and maintenance increases safety and peace of mind for everyone. |
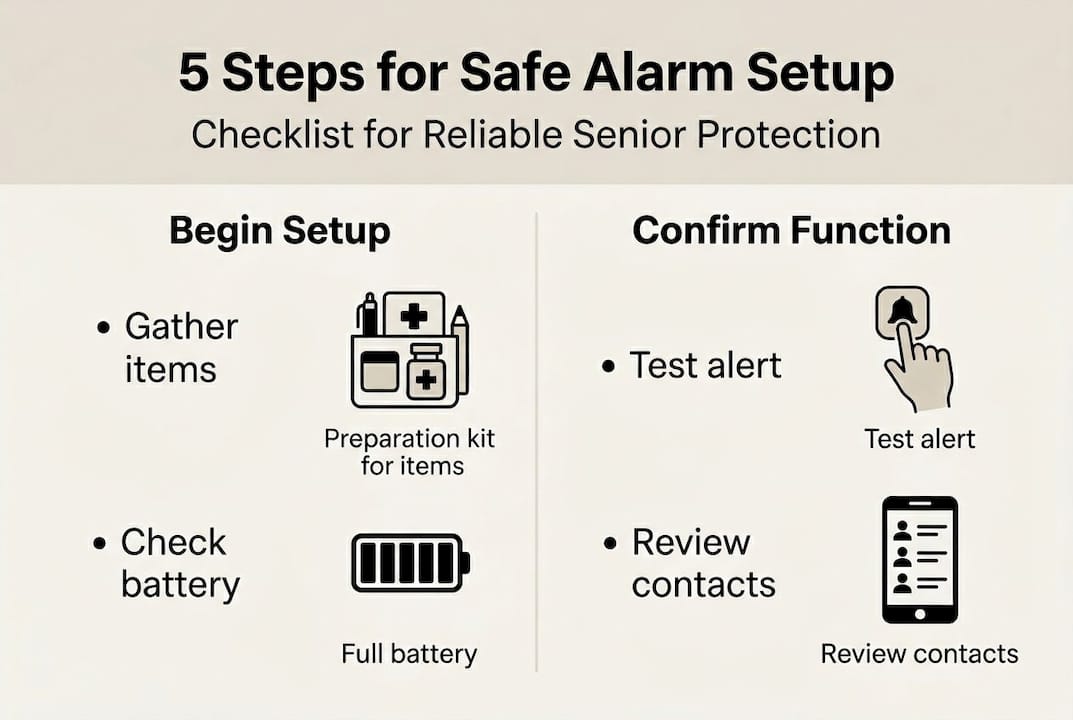
Gathering everything you need for setup
Now that you know why setup is crucial, let’s make sure you have everything you need to get started, without any surprise holdups.
Before you open the box, gather every item you will need. Rushing into setup without the right tools is the number one reason people get frustrated halfway through. A little preparation saves a lot of time.
Here is what you should have ready before you begin:
- The alarm device itself (wrist watch, pendant, or wall button)
- The original charging cable and power adapter
- The user manual (download a digital copy if the paper version is misplaced)
- An active SIM card compatible with your device
- A stable Wi-Fi or mobile data connection nearby
- A list of at least two emergency contacts with full phone numbers
- A flat, well-lit surface away from microwaves, cordless phones, or other electronics
Different device types have slightly different requirements. Use this comparison to check what applies to your setup:
| Device type | SIM card needed | App required | Power source | Typical setup time |
|---|---|---|---|---|
| Wrist alarm watch | Yes | Yes (optional) | Rechargeable battery | 20 to 30 minutes |
| Pendant alarm | Sometimes | Sometimes | Rechargeable or replaceable | 10 to 20 minutes |
| Wall-mounted alarm | No | No | Mains power or battery | 5 to 15 minutes |
One of the most overlooked barriers is an outdated or inactive SIM card. Low battery, poor signal, or missing SIM cards are common reasons for setup malfunctions, so check that your SIM is active before inserting it. Also confirm that the SIM plan supports voice calls if your device uses two-way communication.
Use our alarm setup checklist to make sure nothing is forgotten before you start.
Pro Tip: Set up in a quiet room away from other electronics. Wireless interference from routers, baby monitors, or cordless phones can disrupt signal testing during initial configuration.
Follow step-by-step setup instructions
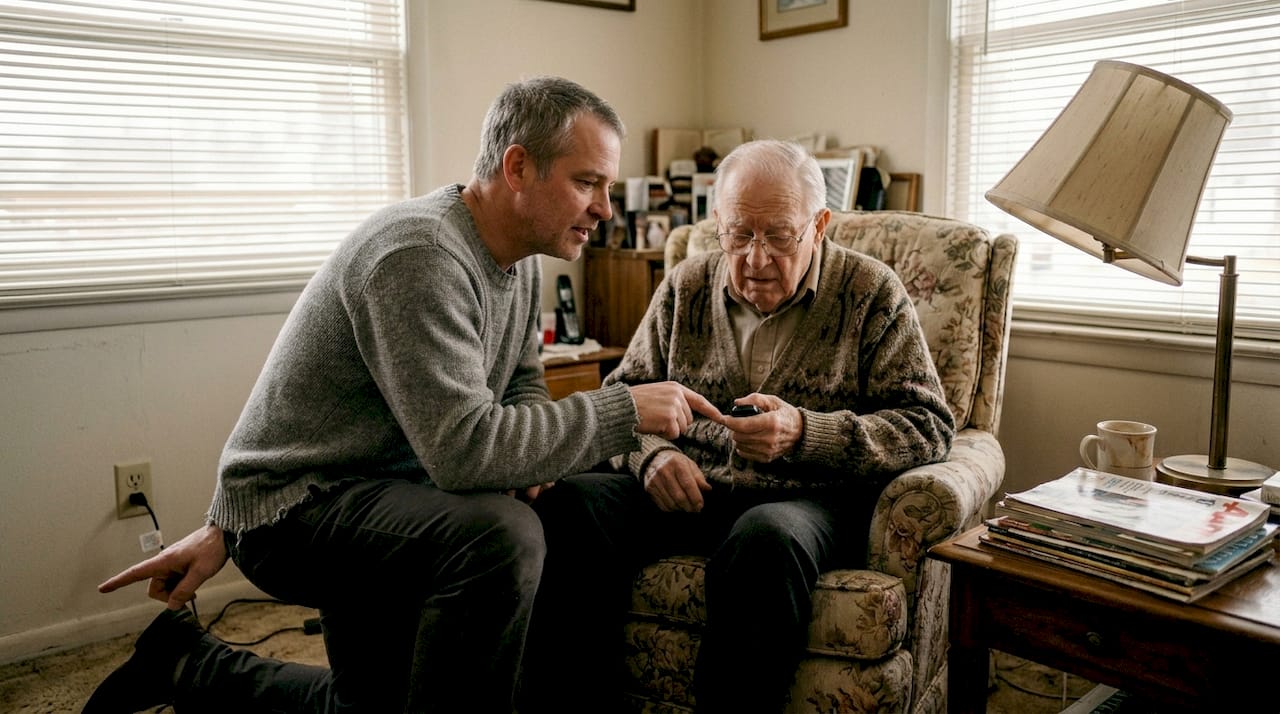
With all your tools in place, let’s walk through the setup together. No tech skills required.
Follow these steps in order. Skipping ahead is tempting, but each step builds on the last.
- Insert the SIM card. Open the SIM tray using the included tool or a small pin. Place the SIM card in the correct orientation as shown in the manual. Close the tray firmly.
- Charge the device fully. Connect the charger and wait until the battery indicator shows 100%. This usually takes one to three hours. Never skip this step, as a partial charge can cause the device to shut off during first use.
- Power on and connect to network. Press and hold the power button until the screen lights up. Wait for the device to find a mobile signal. This can take two to five minutes.
- Program emergency contacts. Go to the contacts menu or companion app. Enter at least two ICE (in case of emergency) contacts. Use full international phone numbers if family members are abroad.
- Activate the device. Follow any registration steps in the app or on the device screen. Some devices require a short activation call to confirm the connection.
- Test the SOS button. Press and hold the SOS button as instructed. Confirm that your emergency contacts receive an alert or call. Ask them to confirm receipt.
Safety note: If your device comes with a lanyard, always use one with a breakaway clasp. A standard cord can pose a strangulation risk if it catches on furniture or a door handle. Check the manual to confirm your lanyard has this safety feature before use.
False alarms and accidental presses can be minimized with careful configuration and training. Walk the senior through the SOS button so they understand when and how to use it.
Pro Tip: Program ICE contacts first, before anything else. If setup is interrupted, at least the most critical information is already saved.
For more detail on each step, see our alarm installation tips and review the alarm watch interfaces guide to understand screen layouts and button functions.
Troubleshooting common setup issues
After setup, a few common issues might pop up, but knowing how to fix them makes all the difference.
Even a careful setup can run into problems. Here are the issues families report most often:
- Weak or no mobile signal
- GPS location not updating
- Device not turning on
- SOS button not sending alerts
- Accidental alarm activations
Use this table to match the problem to a quick fix:
| Problem | Likely cause | Quick fix |
|---|---|---|
| No signal | SIM inactive or poor coverage | Move near a window, check SIM status |
| GPS not updating | Obstructed sky view | Go outside or near an open window |
| Device won’t turn on | Battery fully drained | Charge for 30 minutes before retrying |
| SOS not sending alert | Contacts not saved correctly | Re-enter contact numbers in settings |
| Accidental activations | Button too sensitive | Adjust sensitivity or use protective cover |
Cellular or GPS failures, low battery, and accidental activations cause a large share of canceled EMS calls, which means many emergency responses are triggered by preventable device issues rather than real emergencies. Fixing these early protects both the senior and emergency services.
Before assuming the device is broken, always check power and network first. Plug in the charger, move to a different room, and restart the device. Most issues resolve with these three actions alone.
For deeper guidance on connectivity, visit our article on solving alarm connectivity problems. If you are unsure whether your SOS button is working correctly, our guide on testing alarm buttons covers the full testing process step by step. You can also review a broader overview of medical alert device issues for additional context.
Testing and maintaining your alarm device
Even after setup, making sure your alarm device always works is essential for true peace of mind.
A device that was working perfectly last month may not be working today. Batteries degrade. Contacts change phone numbers. SIM plans expire. Regular testing catches these problems before they matter.
Here is a simple monthly maintenance routine:
- Press the SOS button and confirm at least one emergency contact receives the alert.
- Check the battery level and charge the device if it is below 30%.
- Verify that all saved emergency contact numbers are still correct.
- Inspect the device for physical wear, cracks, or a damaged charging port.
- Check that the SIM card is still active and has sufficient data or call credit.
- If GPS is a feature, step outside and confirm the location updates correctly in the app.
Regular device checks and caregiver involvement can minimize unnecessary emergency contacts and boost confidence in the system for everyone involved.
Maintenance does not need to feel like a chore. Keep the device clean by wiping it with a dry cloth. Avoid submerging it unless the manual confirms full waterproofing. Replace worn straps or lanyards before they break.
Pro Tip: Pair your monthly device check with a regular recurring event, such as the day you pay bills or your weekly family phone call. This makes it easy to remember without setting a separate reminder.
For families supporting a loved one with memory challenges, our article on alarms in dementia care explains how to adapt maintenance routines for seniors who may need extra support.
- Clean the device weekly with a soft, dry cloth
- Store the charger in the same spot every time
- Update emergency contacts any time a phone number changes
- Review the user manual once a year to check for new features or firmware updates
Why alarm device setup isn’t just tech, it’s trust and teamwork
Beyond checklists and wires, there is a deeper reason setup matters.
Consider a situation many families recognize. An adult child sets up a device for their parent in a hurry during a weekend visit. The SOS button works during the quick test. Six weeks later, the parent falls in the kitchen. They press the button, but the SIM card had expired and no alert goes through. That gap between a working test and a reliable system is exactly where most setups fail.
Now contrast that with a family that spends an extra hour verifying contacts, scheduling monthly checks, and walking the senior through how the device feels and works. The senior wears it every day because they trust it. The family checks in regularly not just out of worry, but because it has become a shared habit.
Low usage rates, frequent false alarms, and canceled EMS calls show that even the best devices are only as effective as their setup and maintenance. Technology alone does not create safety. The combination of a well-configured device, informed users, and consistent follow-through does.
Setup is an act of care. When a family takes the time to do it right, they are telling their loved one: we are paying attention, and we will be there. That message matters as much as the device itself. Explore our guide on comparing alarm devices to find the right fit for your situation.
Discover devices and SIM options that simplify setup
Ready to make your safety setup even easier? Here’s where to find helpful devices and support.
Finding a device that is genuinely easy to set up makes a real difference, especially for seniors who are not comfortable with technology. Our range of alarm buttons for seniors is designed with simple interfaces, clear instructions, and no monthly subscription fees.
Whether you are looking for a wrist alarm, a pendant, or a GPS watch, you will find options built for independent living and quick emergency response. Read more about elderly protection with alarm button solutions or explore no-subscription personal alarms that keep costs low without compromising on safety. Our team is available to help you choose the right device and walk you through setup if needed.
Frequently asked questions
What should I do if my alarm device shows no signal during setup?
First, move closer to a window or go outside to help the device find a better signal. Also confirm the SIM card is correctly inserted and that the plan is active, since signal problems are often caused by an inactive or misplaced SIM.
How often should I test my senior alarm device?
Test the alarm at least once a month by pressing the SOS button and confirming that emergency contacts receive the alert. Routine checks improve reliability and reduce the risk of missed alerts during a real emergency.
What are the most common mistakes when setting up a safety alarm for seniors?
Missing components like power cables or SIM cards, setting up in an area with poor signal, and not updating emergency contacts are the most frequent mistakes. Low battery, poor signal, and missing parts cause most early failures, so a thorough pre-setup checklist prevents the majority of problems.
Can I set up a senior alarm by myself, or do I need help?
Most senior alarms are designed for self-setup with clear step-by-step instructions. Having a family member double-check connections and confirm that test alerts are received is always a good idea for added confidence.
What should I do if my device triggers false alarms?
Reposition the device to reduce accidental button contact and check the sensitivity settings in the user manual. Many EMS responses are canceled due to false alarms caused by accidental presses, so a small adjustment in placement or settings can prevent unnecessary disruptions.